REVIEW · JOKULSARLON
Jökulsárlón: Glacier Hike, Ice Cave, and Photoshoot Package
Book on GetYourGuide →Operated by Ice Pic Journeys · Bookable on GetYourGuide
Ice caves and glacier walking in one trip. This tour is built around two big moments: stepping inside lower and upper ice caves and then continuing onto the glacier itself with crampons. It’s also photo-focused, with a guide who handles the hard parts so you can focus on the view and the shots.
Two things I like a lot: you get the full gear setup (helmet, harness, crampons, ice axe, and boots if you request them), and you’re limited to a small group of 10, which makes the pacing feel manageable. The one downside to plan for is simple: it’s exposed, cold, and windy on the glacier—dress for winter, not for the drive in.
In This Review
- Key highlights at a glance
- Why Jökulsárlón does glacier magic so well
- Super Jeep ride: the smart start before the cold hits
- The walk to the glacier edge: terrain, pacing, and gear setup
- Inside the lower and upper ice caves: what to expect on shifting ice
- Glacier hiking with crampons: crystal formations and a gradual climb
- The photo package: how to get images you’ll actually want
- Gear and cold-weather reality check: what to bring
- Group size, guide style, and how this stays manageable
- Price and value: what you’re paying for at $436
- Who this tour fits (and who should skip it)
- Should you book the Jökulsárlón glacier hike and ice cave photo package?
- FAQ
- What does the tour include for ice cave and glacier walking?
- How long is the tour?
- Do you visit both ice caves?
- What kind of hiking is involved?
- What size group is it?
- Where do we meet the guide?
- What should I bring since winter clothing is not included?
- Who is this tour not suitable for?
Key highlights at a glance
- Super Jeep transfer to Vatnajökull Glacier so you start the day efficiently
- Lower and upper ice caves with time to explore both natural chambers
- Crampon glacier hiking (5.4 km total) with an easier first half and a gradual uphill stretch later
- Professional photographer plus a 5-shot package (action, portraits, group, ice caves, and wider scenes)
- Certified glacier guide who manages safety gear and navigation
Why Jökulsárlón does glacier magic so well
Jökulsárlón is famous for dramatic ice scenes, but this tour is about something more practical than a quick stop for photos. You’re not just looking at ice from one angle. You’re moving through it: first on foot through glacial tundra, then into ice caves, and finally onto the glacier surface with crampons.
What makes that feel special is the rhythm. You get a walk-through start, then the intensity rises with the caves, then it settles into steady glacier hiking. Even the guide’s explanation matters here. Ice caves are described as dynamic—old ones melt and new ones form—so what you’ve seen online may not match what you’ll find that day. That’s not a tease. It’s a real reminder that you’re experiencing ice that’s alive and changing.
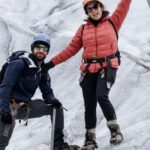
And yes, the photo angle is real. The photographer doesn’t just snap from a distance. You’ll get captured inside caves and out on the glacier, including action-style and portrait-style moments. If you want images that look like you earned them (and not like you were just standing there), this structure helps.
You can also read our reviews of more tours and experiences in Jokulsarlon.
Super Jeep ride: the smart start before the cold hits
The day starts with transport by super jeep to Vatnajökull Glacier. That matters more than it sounds. You’re going to be dealing with uneven, icy conditions, and a regular car ride won’t make the rest of the tour feel as smooth. The super jeep is part of how this experience stays in control from minute one.
You’ll meet your group at a silver Nissan Patrol parked next to the public bathrooms, with company info on the side reading Ice Pic Journeys. Getting there is straightforward, and the parking landmark helps if you’re arriving on your own schedule.
Once you’re dropped close enough, the tour shifts from vehicle to walking. The first stretch is described as relatively easy: rocky terrain, but fairly flat. That’s a good warm-up. It helps you get your footing and your breath under control before the gear goes on and the cave time begins.
The walk to the glacier edge: terrain, pacing, and gear setup
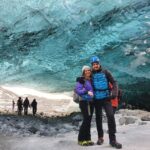
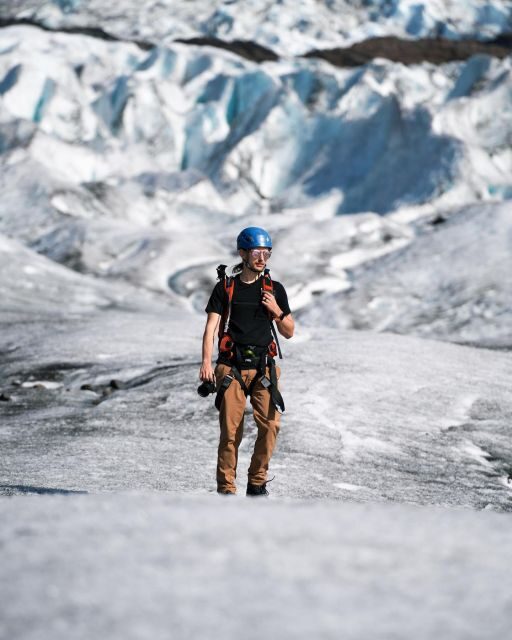
Before you touch ice, you’re crossing alien-like glacial tundra. It sounds poetic, but it’s also practical training for what’s next. Your guide drives you to the glacier edge, then helps you put on crampons.
Crampons are one of those things that feel intimidating until someone fits them correctly. The advantage of this tour is that the guide doesn’t treat gear as your problem. They assist with putting it on, and that immediately boosts confidence for the rest of the day. The included setup also includes a helmet and a harness, plus an ice axe and crampons.
From there, you’ll explore both ice caves. But don’t assume the day is one long cave-and-photos routine. There’s structure. After the lower cave, you switch back into hiking mode, and you gear up again for the glacier hike.
The overall hike distance is 5.4 km. The tour description rates it as easy overall, with some moderate effort. The reason it can be “easy” yet still feel challenging is pacing: the terrain changes, and the final portion includes a gradual incline of about 20 minutes.
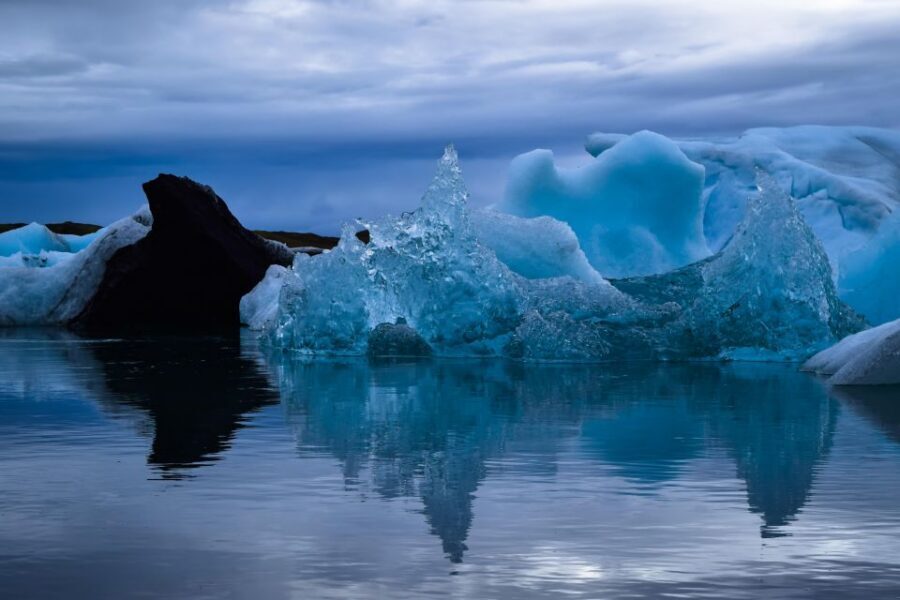
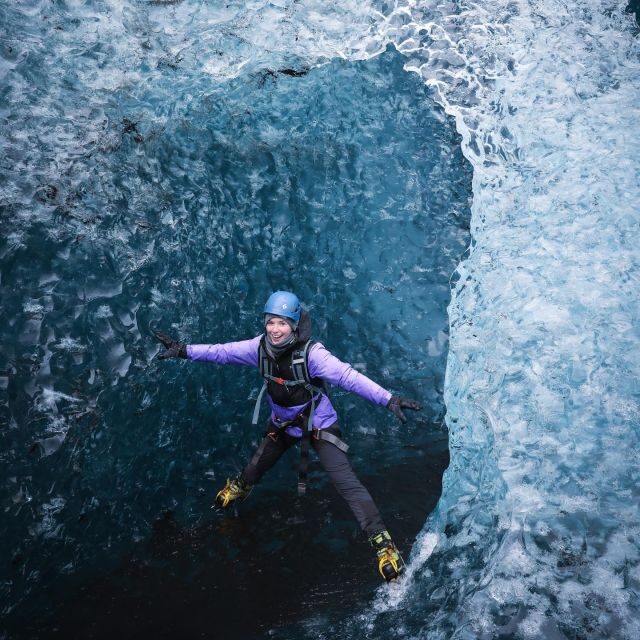
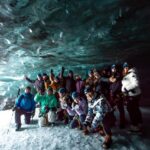
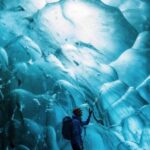
Inside the lower and upper ice caves: what to expect on shifting ice
The highlight is clear: you’ll go into both the lower and upper ice caves. That’s not just a checklist item. Doing both adds variety in lighting, textures, and how the spaces feel. Lower caves tend to be moodier and visually dense, while upper areas can feel more open depending on how the ice is shaped that day.
One of the most useful pieces of advice embedded in the tour info is about expectations. Ice caves are dynamic, meaning the exact cave you see today could be very different from photos posted at other times. So if you’re thinking, I want the iconic shot I saw online, keep the mindset flexible. The real payoff is experiencing a cave that’s unique to the moment and the conditions.
You’ll also have a photographer working during cave time. The tour package says you’ll get ice cave shots captured as part of a 5-shot photo set per person. Practically, this means you can slow down and look, while still knowing someone is coordinating timing for portraits and action-style images.
Also remember: colder conditions add up. It may feel chilly even before you step inside. Once you’re in caves, air can feel colder and darker. Bring the right outer layer and be ready to move slowly on uneven, icy ground.
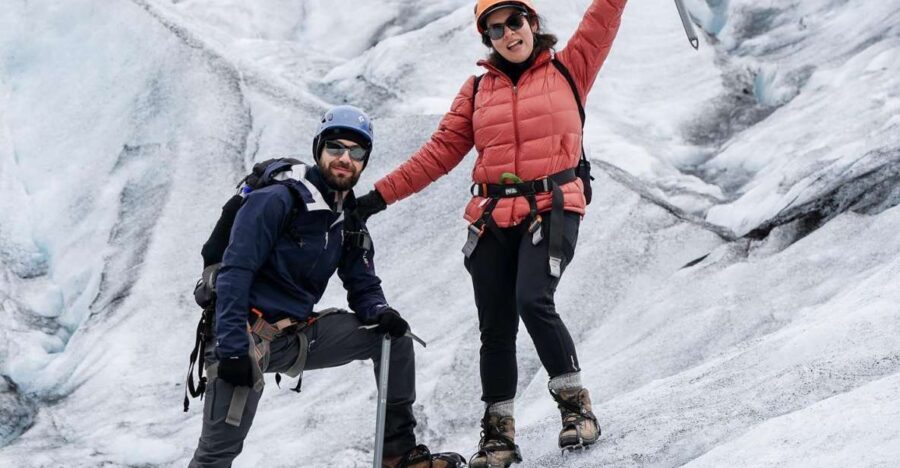
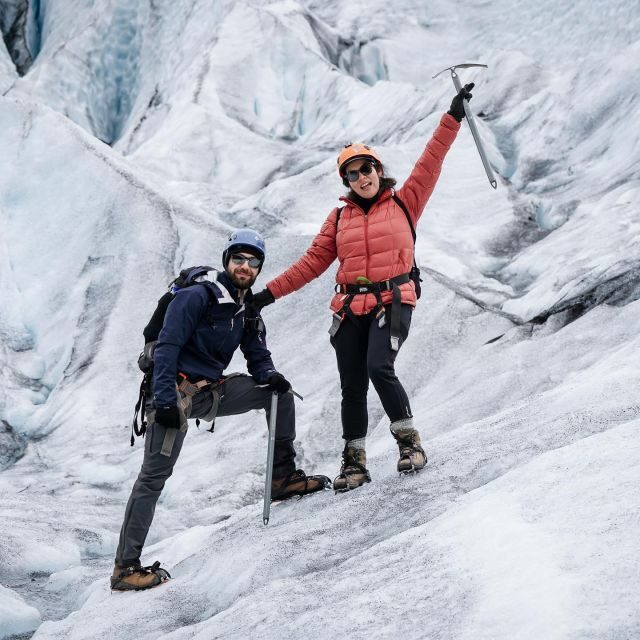
Glacier hiking with crampons: crystal formations and a gradual climb

After the caves, it’s time to hike the glacier with crampons. This is the part that turns the day from scenic to genuinely memorable.
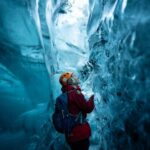
Your guide leads you to many different formations on the ice, including crystal crevasses—those sharp, sparkling ice lines that show how the glacier is moving and cracking beneath the surface. The scenery is described as creating an experience you can’t really picture until you’re surrounded by it. That’s exactly how glacier terrain works: your brain struggles to map it, then your eyes start finding patterns.
The hike starts with the easier stretch: the first half is flat yet rocky. That’s your adjustment period. Then the second half goes up a gradual incline for about 20 minutes. It’s not described as a steep climb, but it is longer effort, and the crampons make sure you feel the control you need.
Gear helps a lot. The included kit isn’t casual hiking equipment. With helmet, harness, crampons, and an ice axe in the mix, the tour is built for safe movement in ice conditions. Still, you should bring a calm mindset. Your job is to keep steps steady and follow the guide’s instructions.
If you’re the type who panics when footing changes, this is a good tour to choose because it’s small-group and guided. Fewer people means more attention. And because the guide assists with crampons at the start, you’re less likely to fight your gear while you’re trying to learn the terrain.
You can also read our reviews of more photography tours in Jokulsarlon

The photo package: how to get images you’ll actually want
This package is refreshingly clear about what you get: 5 shots per person, including action, portraits, group, landscapes, and ice cave shots.
A lot of tours promise photos but don’t explain what kind. Here, you have categories. That’s helpful because you can think about your posture and timing before each segment:
- For action shots, you’ll want to move naturally—crampon walking looks best when you’re not freezing in place.
- For portraits, small turns of the body and calm expressions usually work better than big “pose energy.”
- For group photos, listen for the moment when the photographer wants everyone lined up; the ice isn’t forgiving about rushing.
One more good thing: you’re not waiting until the end to get photos. The photographer captures you in the caves and on the glacier. That gives the images variety, which is what most people really want in an Iceland album—one theme is never enough when the environment keeps changing.
And from the review feedback included in the tour info, the camera side is treated as real work, not a bonus afterthought. The tour experience is designed to leave you with images that match what you lived through: cave time and glacier walking, not just icy scenery.
Gear and cold-weather reality check: what to bring
This is one of those tours where your clothes matter as much as your attitude. The tour info warns that it will be colder than you think on the glacier, with wind and exposure. If you show up in light layers, you’ll feel it quickly, and you’ll spend more energy shivering than enjoying.
Here’s what the tour includes: glacier and ice cave gear (helmet, harness, crampons, and an ice axe) plus hiking boots upon prior request.
What’s not included is the winter clothing that keeps you warm: gloves, hat, wind/rainproof jacket, and warm layers. Sunglasses and a water bottle aren’t included either. A packed lunch also isn’t included.
My practical advice:
- Wear warm layers you’ve already tested once at home.
- Bring gloves you can move in. You don’t want numb fingers while trying to adjust clothing or stay comfortable during photos.
- Use a windproof outer layer. Wind on ice changes the feel fast.
- If you need stiff hiking boots, message ahead with your shoe size so the tour can arrange what they mention as available.
Even if you’re an outdoorsy person, I’d treat this as a winter day on ice first, sightseeing second.
Group size, guide style, and how this stays manageable
With a small group capped at 10, the day tends to feel controlled. Ice cave and glacier walking can be slow because safety requires spacing and attention. A bigger group can turn that into a stressful shuffle. A smaller group makes it easier for the guide to assist with gear and for the photographer to capture shots without everyone getting in each other’s way.
The tour runs for about 5 hours. That time window is long enough to do both caves and complete the glacier portion, but short enough that you’re not spending half a day just waiting around. The itinerary is built around movement: super jeep out, walking to the edge, caves, then glacier hike, then back.
The guide is live and English-speaking. That matters for comfort when the environment is new and rules are important. You’ll want to understand instructions for crampons and ice movement.
The reviews included with the tour info also point strongly toward the guide and the photo side being thoughtful and attentive. That matches what you’d expect from a glacier hike where safety depends on clear communication and smooth pacing.
Price and value: what you’re paying for at $436
At $436 per person for a 5-hour experience, you’re paying for more than “a scenic walk.” The value is in four areas that add up fast:
- Certified glacier guide for safety and route management
- Professional photographer capturing you in caves and on-ice during the hike
- Specialized ice gear including helmet, harness, crampons, and an ice axe
- The logistics of reaching Vatnajökull and walking on glacier terrain in a super jeep–supported format
Many lower-priced Iceland tours give you transport and a general guide, but not a full gear-and-photo package and not time in both lower and upper caves plus glacier hiking. If you care about doing the hard stuff correctly—gear fitted, caves explored safely, photos handled—this price starts to look more reasonable.
It’s also a small-group tour, which can influence value. Fewer people often means more attention at gear time and smoother photo coordination.
If your goal is only to see ice caves from a distance and you don’t want to hike, then this may be more than you need. But if you want the full glacier experience with professional images to take home, it’s priced in the right lane.
Who this tour fits (and who should skip it)
This tour isn’t for every body type or every comfort level.
It’s not suitable for:
- Children under 10 years
- People with mobility impairments
If you’re traveling with kids: all persons under 18 must be accompanied by an adult. Also, Icelandic car-seat rules apply for children under certain heights, and children under 135 cm need a child car seat when traveling in a car. Taller children can use a car seat if intended for their height/weight. Children under 150 cm must not sit in front of an active airbag. (If you’re driving to the meeting point, plan for this.)
Fitness-wise, the hike is rated as easy with some moderate effort. The first half is flat-ish and rocky, but the glacier portion includes a gradual uphill incline for about 20 minutes. So you should be comfortable walking on uneven ground in winter conditions.
This tour is a great match if you:
- Want real glacier walking, not just viewpoints
- Care about safety gear being handled for you
- Want photos with action and cave scenes captured
- Prefer a small group
Should you book the Jökulsárlón glacier hike and ice cave photo package?
I’d book this if you want a glacier day that’s structured, safe, and genuinely photo-worthy. The combination of two ice caves, crampon hiking on the glacier, and a specific 5-shot photo package makes it more complete than the typical “see the caves, take a few pictures, leave” option.
Skip it if cold, wind, and exposed conditions don’t match your comfort level—or if you’re not able to manage winter hiking gear and uneven ice terrain. Also, if you’re traveling with younger kids, remember the age limit starts at 10.
If you’re in the sweet spot—able to hike a 5.4 km route with an incline section and ready to dress for glacier weather—you’ll likely walk away with both memories and photos that look like they belong to an Iceland you can’t scroll past.
FAQ
What does the tour include for ice cave and glacier walking?
It includes a certified glacier guide and a professional photographer, plus glacier and ice cave gear like a helmet, harness, crampons, an ice axe, and hiking boots upon prior request. You also get a 5-shot photo package per person.
How long is the tour?
The tour duration is 5 hours.
Do you visit both ice caves?
Yes. The tour includes exploring both the lower ice cave and the upper ice cave.
What kind of hiking is involved?
The total hike is 5.4 km. The first half is relatively flat and rocky. The second half includes hiking on the glacier with a gradual incline for about 20 minutes. Overall, it’s rated as easy with some moderate exercise.
What size group is it?
The group is small, limited to 10 participants.
Where do we meet the guide?
You meet at a silver Nissan Patrol parked next to the public bathrooms, with company information Ice Pic Journeys on the side.
What should I bring since winter clothing is not included?
Winter clothing such as gloves, a hat, a wind/rainproof jacket, and warm layers are not included. Sunglasses and a water bottle are also not included.
Who is this tour not suitable for?
It is not suitable for children under 10 years and for people with mobility impairments. All persons under 18 must be accompanied by an adult.